The Somme battlefield was incredibly muddy
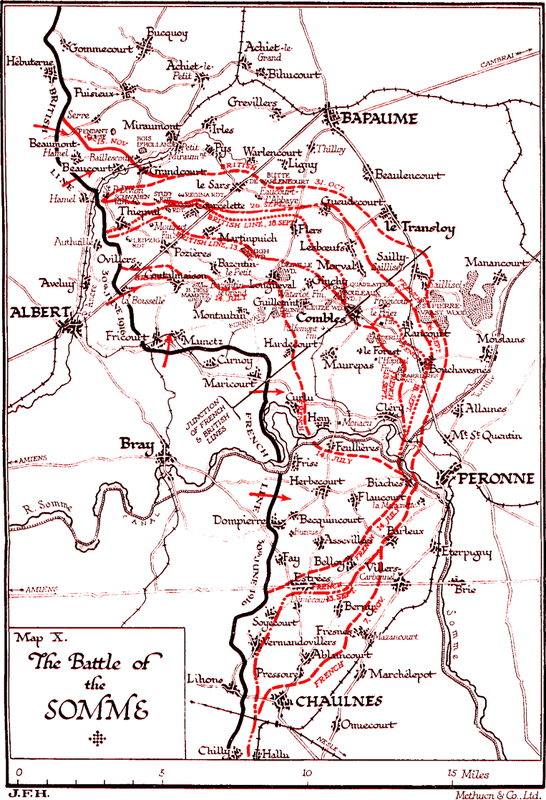
The Battle of the Somme began on July 1st, 1916. At 7.30 am the whistle sounded for the British soldiers to "go over the top". Eleven divisions of men, heavily laden, advanced, following orders to walk slowly. A week long bombardment prior to this initial attack saw the British artillery pound the German forward defences with 1.6 million shells. However, the Germans were prepared for the bombardment and so it did little damage, making the battle ahead much more difficult for the Allied troops than originally intended. The German's had taken up position behind their machine guns and by the end of the day, the British had suffered nearly 60,000 casualties. This was only the beginning of one of the bloodiest battles in human history. The New Zealand division, fighting as part of the XV Corps of the British Fourth Army saw action multiple times, starting on September 12th, until they were withdrawn from the front line in early October.
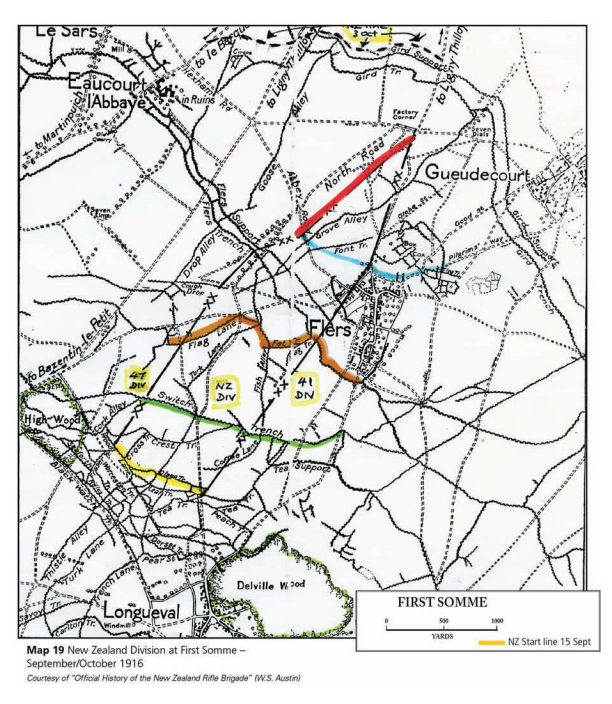
The New Zealand division made their debut on the Somme battlefield at the Battle of Flers-Courcelette. This battle was part of the third and final push from the British. Since early August, Sir Douglas Haig had hoped for a key breakthrough offensive in mid-September. Haig hoped to break through the German defences near Bapaume, an important road and rail centre. He hoped that the cavalry would then break through the gap created in the German defences with the help of 48 tanks, reduced to 32 after mechanical breakdowns, the first use of tanks in this war. Haig's aim was to take Courcelette, Lesboeufs and Morval. This offensive required eleven divisions of men, including the New Zealand division, and the front would cover 12,000 yards. A preliminary bombardment began on 12 September, where the New Zealand artillery went into action. By 14 September, the New Zealand division was in trenches around High and Delville woods. The New Zealand division was under the command of Lieutenant General Rawlinson, commander of the British Fourth Army. Out of fifteen divisions, the New Zealand division was given the task of capturing the village of Flers. The New Zealand infantry went into action days later, as they received the call to go over the top at 6.20am on 15 September. The XV Corps of the British Fourth Army of which New Zealand was a part of, attacked in the centre of the line. They started in the gap between High Wood and Delville Wood, with British divisions either side. Tanks kept pace with the infantry, providing a covering barrage. The fighting was difficult, using rifles, bayonets and grenades. Eventually, battalions of the New Zealand Rifle Brigade seized the trench lines around Flers and the village was taken. The divisions in the XV Corps made the greatest advances that day. This was not without a cost however, as out of the 6000 New Zealand soldiers that went over the top that day, there were 1200 casualties, with around 600 dead. There was no dramatic breakthrough on the line and it would be another week of costly battles before a major assault could be made on Lesboeufs and Morval.
Arduous efforts were made to reinforce the area that had been seized. The Allies prepared for the inevitable counter-attack by the Germans, moving field guns forward, bringing up supplies of wire and ammunition and digging more trenches to provide shelter from the impending German counter-attack. The New Zealand division put pressure on the Germans throughout the first night after Flers had been seized, continually firing into areas where it was thought Germans might be preparing for a counter-attack. Field guns also searched for roads and German supply dumps. The rain turned the battlefield into thick, deep mud, making it difficult to move men and equipment and relocate the artillery.
On 20-21 September, the 2nd Canterbury Battalion of the New Zealand division made a night-time attack. The New Zealanders had been left exposed as the British divisions on either side of them had not achieved all of their objectives. The German soldiers had then targeted a communication trench, known as Goose Alley. The New Zealand soldiers were discovered 50 yards from the German wire, and the German troops opened fire with machine guns. They fought their way into the trenches and then defended against the numerous counter-attacks made by the Germans as they attempted to take back the trench. A lull in the fighting allowed the New Zealanders to renew their defence before the Germans attacked again. Eventually, the New Zealanders left the trench and bombed the Germans from above. The New Zealanders had now secured the area around Goose Alley, with the Germans losing 5 machine guns and nearly 300 men.
The New Zealand division continued to advance and on 25 September begun the battle of Morval, where the New Zealand division assisted in the capture of Morval. Battalions of the First Brigade of the New Zealand division attacked across a front of 1500 metres. They secured ground and German prisoners, and dug trenches in preparation for a main attack in two days. Two days later, the Canterbury battalion achieved their objectives but the Auckland and Otago battalions struggled as they dealt with uncut wire while attacking the German line. Eventually however, the Germans were forced to retreat and the battalions achieved their objectives. At a cost however, as the Auckland and Otago battalions suffered high casualties.
The last battle the New Zealand division was involved in was the battle of Le Transloy, which according to the Australian official historian, Charles Bean, the conditions at the Somme were "the worst ever known by the First A.I.F." The New Zealand division participate in the capture of Eaucourt l'Abbaye, and they achieved all their objectives. The weather then made a turn for the worse and the Allies were unable to further progress. Eventually, the New Zealanders were relieved by other British units. All of their success did come at a price, however. In just 23 days, the New Zealand division suffered around 7000 casualties.